I recently put some spare disks into a Power S814 server, and when I tried installing an OS, be it VIOS or Debian, it would say that there were no disks available to install onto.
It turns out that the RAID configuration on the controller and the disks didn’t match. This is par for the course with any RAID controller, even in the x86 world. It also didn’t help that some of the disks were formatted for IBM i, which uses non-512-byte block disks. We need to use the vendor utility to clear out the RAID config, and format the disks to be usable by commodity operating systems.
The two utilities IBM provides for this are either the diagnostics on the AIX Standalone Diagnostics disc, or using the iprutils set of software. Since netbooting Linux was easier as I don’t have a NIM server, I’m choosing to do the latter here.
Installing iprutils
This should be in the repository of most distributions. Since I’m using Alpine here, I just had to add the community repository, and then apk add iprutils.
Formatting the disks
The iprconfig command provides a smit-style menu to manage the RAID controller, as shown below.
IBM Power RAID Configuration Utility
Select one of the following:
1. Display hardware status
2. Work with disk arrays
3. Work with disk unit recovery
4. Work with configuration options
5. Work with microcode updates
6. Devices Statistics
7. Analyze log
Selection:
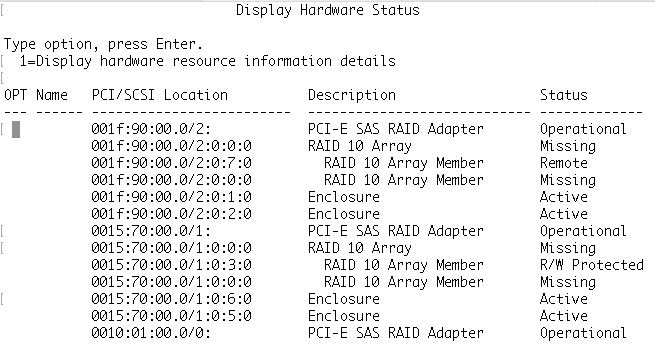
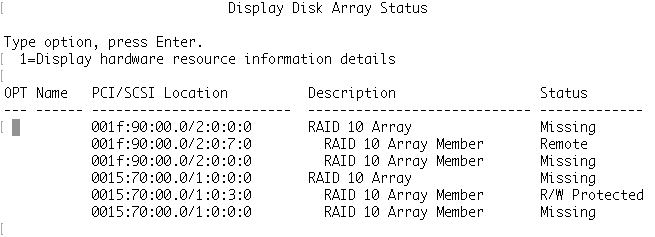
e=ExitIf you poke around in “display hardware status”, you’ll probably find that the controller is horribly confused about the state of the disks. The “disk array status” under “work with disk arrays” will also probably show a nonsense array configuration.
If we go back to the main menu, we want the options for “disk unit recovery”. Select that, and you’ll get another list of options.
                          Work with Disk Unit Recovery


Select one of the following:

    1. Concurrent add device
    2. Concurrent remove device
    3. Initialize and format disk
    4. Reclaim IOA cache storage
    5. Rebuild disk unit data
    6. Force RAID Consistency Check
    7. Work with resources containing cache battery packs
    8. Display SAS path status
    9. Work with disk enclosures


Selection:


e=Exit   q=Cancel
We want “initialize and format disk”. Select that, and you’ll get a list of disks to format. (In my screenshot, I’ve formatted the drives already.)
                     Select Disks for Initialize and Format

Type option, press Enter.
  1=Select

OPT Name   Resource Path/Address      Vendor   Product ID          Status
--- ------ -------------------------- -------- ------------------- -------------
           00-0C-00                   IBM      ST300MP0005         Zeroed
           00-0C-03                   IBM      AL14SEB060N         Zeroed
           00-0C-02                   IBM      ST300MP0005         Zeroed
           00-0C-01                   IBM      ST300MP0005         Zeroed


e=Exit   q=Cancel   t=Toggle
Select all the disks (or just a few, if you know what you need to format) by typing 1 in each row, and confirm if needed. It took me about an hour to format three 300 GB disks and a single 600 GB disk.
After formatting, I’ve found I didn’t need to do anything such like “rebuild disk unit data”, and the array config already cleared out.
Building an array
Now that the disks are formatted, let’s make an disk array (or multiple if you choose). From the main menu, select “work with disk arrays”.
                              Work with Disk Arrays


Select one of the following:

    1. Display disk array status
    2. Create a disk array
    3. Delete a disk array
    4. Add a device to a disk array
    5. Format device for RAID function
    6. Format device for JBOD function
    7. Work with hot spares
    8. Work with asymmetric access
    9. Force RAID Consistency Check
    0. Migrate disk array protection


Selection:


e=Exit   q=Cancel
Select “create a disk array”.
                               Create a Disk Array

Select the adapter.

Type choice, press Enter.
  1=create a disk array

OPT Name   Resource Path/Address      Vendor   Product ID          Status
--- ------ -------------------------- -------- ------------------- -------------
           FE                         IBM      57D8001SISIOA       Operational


e=Exit   q=Cancel   t=Toggle
Select the adapter you want to use with 1.
                        Select Disk Units for Disk Array

Type option, press Enter.
  1=Select

OPT Name   Resource Path/Address      Vendor   Product ID          Status
--- ------ -------------------------- -------- ------------------- -------------
           00-0C-00                   IBM      ST300MP0005         Zeroed
           00-0C-03                   IBM      AL14SEB060N         Zeroed
           00-0C-02                   IBM      ST300MP0005         Zeroed
           00-0C-01                   IBM      ST300MP0005         Zeroed


e=Exit   q=Cancel   t=Toggle
Select the disks you want by entering 1 in the rows, then press Enter. You should see the array options, like configuring striping.
                    Select Protection Level and Stripe Size

 Default array configurations are shown.  To change
 setting hit "c" for options menu.  Highlight desired
 option then hit Enter

 c=Change Setting

Protection Level . . . . . . . . . . . . :  RAID 0
Stripe Size  . . . . . . . . . . . . . . :  256 k
Queue Depth (default =  16)(max = 128) . :  16


Press Enter to Continue

e=Exit   q=Cancel
Change things if you want, then press enter. It’ll ask to confirm your choice, and do so if it looks correct. Creating the array is fast, at least for smaller arrays. If you mess up, you can always delete the array from the menu and try again.
Ending notes
If you look in “display disk array status”, you’ll notice two devices for each array you’ve made, depending on what hardware you have.
                            Display Disk Array Status

Type option, press Enter.
  1=Display hardware resource information details

OPT Name   PCI/SCSI Location          Description                  Status
--- ------ -------------------------  ---------------------------- -------------
    sdb    001f:90:00.0/2:2:0:0       RAID 0 Array                 Non-Optimized
           001f:90:00.0/2:0:7:0         RAID 0 Array Member        Remote
    sdd    001f:90:00.0/2:2:1:0       RAID 5 Array                 Non-Optimized
           001f:90:00.0/2:0:5:0         RAID 5 Array Member        Remote
           001f:90:00.0/2:0:4:0         RAID 5 Array Member        Remote
           001f:90:00.0/2:0:6:0         RAID 5 Array Member        Remote
    sdc    0015:70:00.0/1:2:1:0       RAID 5 Array                 Optimized
           0015:70:00.0/1:0:0:0         RAID 5 Array Member        Active
           0015:70:00.0/1:0:2:0         RAID 5 Array Member        Active
           0015:70:00.0/1:0:1:0         RAID 5 Array Member        Active
    sda    0015:70:00.0/1:2:0:0       RAID 0 Array                 Optimized
           0015:70:00.0/1:0:3:0         RAID 0 Array Member        Active


e=Exit   q=Cancel   r=Refresh   t=Toggle
This refers to “asymmetric access“, and is for multipath disk access with multiple controllers. One of these paths is direct and faster, and the redundancy exists for high availability. You’ll notice “display hardware status” shows the non-optimized array as having remote members.
iprconfig can also do other things, like add disks to an array, or set up JBOD mode or disks or controllers.
One thought on “Formatting disks and clearing RAID config on Power systems with iprutils”