I recently got interested in trying out iSCSI, since I had spare capacity on my server. For those unaware, iSCSI can expose block devices over a network. Instead of a file system, it exposes a (virtual) disk, and lets the system connecting to it manage high-level details, including its own file system. This has very different trade-offs from file sharing like SMB/NFS; sharing the disk isn’t really possible, but you avoid a lot of the performance impact from (often different) file system semantics.
This makes it possible to do things you might otherwise not recommended with file sharing, like hosting a Steam library on it. Especially so if you have the iSCSI setup on its own network. Remember, most file systems assume a mostly direct connection to disk. Running this over a shared Ethernet connection, let alone WiFi might not be the best idea.
Also note that I’m not describing a secure setup here. This is very much “baby’s first”, and should only be done on a secure network, or as an experiment. Securing it will involve properly configuring things like portal groups, and isn’t covered in this article. I might cover it in a later article.
This also synthesizes a lot of information I found online; in particular, this basically digests some information in the FreeBSD handbook about the iSCSI target subsystem and ZFS volumes, plus Red Hat and Oracle documentation on iscsiadm.
Setting up volumes and ctld on FreeBSD (the target)
iSCSI nomenclature involves basically the initiator (client) connecting to the target (server) and picking what LUNs it wants (devices). This section will set up the server/target side.
My storage server runs FreeBSD; the main reason is that ZFS is well-integrated, but iSCSI is also nicely tied together here. The main thing we’ll use from ZFS here is a ZFS volume. Unlike the datasets (file systems) in ZFS you might be used to, a volume is just a bunch of blocks. You could use this as a backing store for anything from virtual machine disks, or in this case, an iSCSI target.
First, let’s create a volume. Note some of the fancy ZFS features can be used with volumes – compression, for instance. You decide if you want that, and how big you want your volume to be.
# zfs create -V 4GB -o compression=on srv/targetYou should see it when you do a zfs list.
ctld
Next, let’s create the iSCSI target (on FreeBSD, ctld) daemon config file in /etc/ctld.conf. We specify a portal group, which is how iSCSI handles where things like authentication, discovery rules, and where to listen (As mentioned, this config will not be secure, but it is simple – it listens on everything, for everyone.). The target itself will contain the LUNs, and is named. iSCSI has its own naming convention, but it basically consists of a reverse DNS name, the date of domain acquisition, and the target’s name. ZFS volumes can be specified under a magic directory in /dev/zvol.
portal-group pg0 {
	discovery-auth-group no-authentication
	listen 0.0.0.0
	listen [::]
}

target iqn.2022-12.ca.scrollwheel:target0 {
	auth-group no-authentication
	portal-group pg0

	lun 0 {
		path /dev/zvol/srv/target
	}
}
(An astute reader might note that unlike the FreeBSD handbook’s example, we don’t specify the size. ctld is smart enough to get the size of the disk itself. I believe you only need to specify the size to say, create a target backed by a file.)
Next, add ctld_enable="YES" to /etc/rc.conf to enable the iSCSI target, and start it with service ctld start. If you don’t start it with administrator privileges, you’ll get cryptic messages about not being able to load the iSCSI kernel module. It should now be listening.
Setting up the initiator on Linux
The initiator on Linux, at least, comes from Open-iSCSI, so this should apply for most distros. I’ve tested with Fedora, so it should probably be similar on Red Hat based systems. I find its syntax a bit confusing, so this will describe what worked for me.
Let’s try discovering our target. We tell it to enter discovery mode, in sendtargets mode (the simple built-in way to look for targets in iSCSI, as opposed to more involved methods like a naming server such as iSNS), with our portal group at 192.168.2.250:3260 (the default iSCSI port).
$ sudo iscsiadm -m discovery -t st -p 192.168.2.250:3260
192.168.2.250:3260,-1 iqn.2022-12.ca.scrollwheel:target0
Cool, we found our target. Let’s log into our target specifically. We tell it to try logging in (the -l flag) in node mode (to manage specific connections), as well as provide it the target and portal group.
$ sudo iscsiadm -m node -T iqn.2022-12.ca.scrollwheel:target0 -l -p 192.168.2.250:3260
Logging in to [iface: default, target: iqn.2022-12.ca.scrollwheel:target0, portal: 192.168.2.250,3260]
Login to [iface: default, target: iqn.2022-12.ca.scrollwheel:target0, portal: 192.168.2.250,3260] successful.
(Note that in theory you could combine -l and discovery mode to log into all discovered targets. That seems a little dangerous to me, so I like to be specific.)
Now, you can also see some chatter on dmesg too, that you now have the disk visible to the kernel, as any other SCSI device:
[17614.235556] iscsi: registered transport (tcp)
[18067.531534] scsi host9: iSCSI Initiator over TCP/IP
[18067.548887] scsi 9:0:0:0: Direct-Access FREEBSD CTLDISK 0001 PQ: 0 ANSI: 7
[18067.553228] sd 9:0:0:0: Attached scsi generic sg1 type 0
[18067.553392] sd 9:0:0:0: Power-on or device reset occurred
[18067.553909] sd 9:0:0:0: [sdb] 8388608 512-byte logical blocks: (4.29 GB/4.00 GiB)
[18067.553912] sd 9:0:0:0: [sdb] 8192-byte physical blocks
[18067.554191] sd 9:0:0:0: [sdb] Write Protect is off
[18067.554194] sd 9:0:0:0: [sdb] Mode Sense: 7f 00 10 08
[18067.554861] sd 9:0:0:0: [sdb] Write cache: enabled, read cache: enabled, supports DPO and FUA
[18067.555681] sd 9:0:0:0: [sdb] Optimal transfer size 1048576 bytes
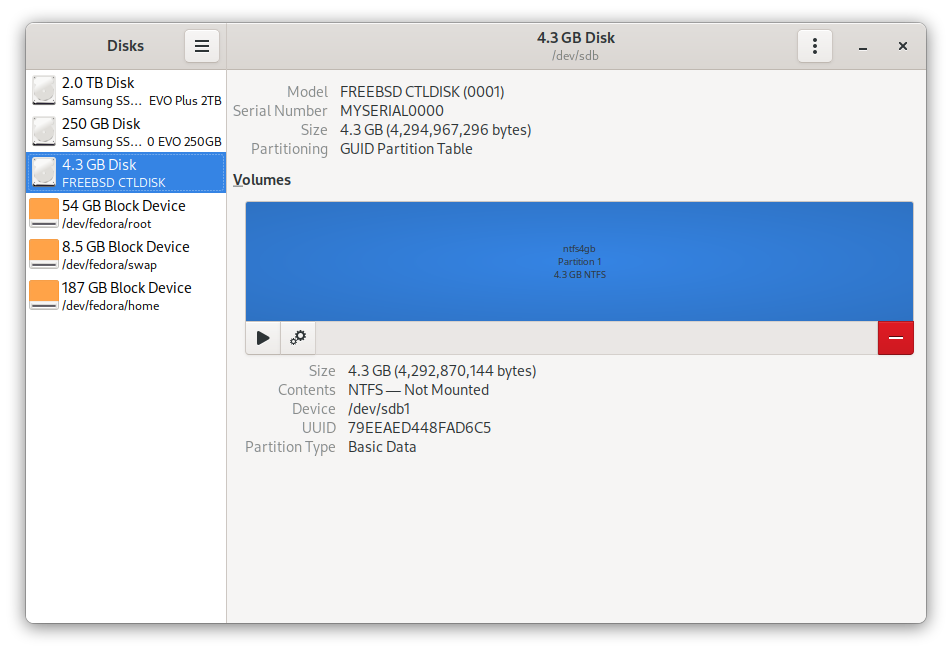
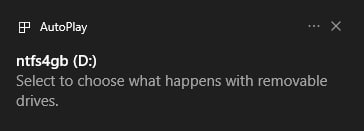
[18067.568721] sd 9:0:0:0: [sdb] Attached SCSI diskThe resulting disk is empty – you’ll have to partition it yourself. Use whatever file system and tools you want, though do keep in mind that you’ll have the base properties of whatever volume management (in this case, ZFS, so I have compression and mirroring – I don’t necessarily let the file system handle that). For my example, I used NTFS, since I wanted to also mount it with Windows (and perhaps use it to say, store games).
When you’re all done and want to disconnect, you can use the -u flag the same way you logged in, to log out.
$ sudo iscsiadm -m node -T iqn.2022-12.ca.scrollwheel:target0 -u -p 192.168.2.250:3260
Logging out of session [sid: 1, target: iqn.2022-12.ca.scrollwheel:target0, portal: 192.168.2.250,3260]
Logout of [sid: 1, target: iqn.2022-12.ca.scrollwheel:target0, portal: 192.168.2.250,3260] successful.
Setting up the initiator on Windows
Windows actually has a pretty robust and really easy to use initiator out of the box, at least on enterprise Windows 10. Just look for the iSCSI Initiator in the start menu, or search for it. It’ll ask you to start the initiator service, then we can get rolling. Enter the portal group here:

Discovery happens immediately. Pick the target:
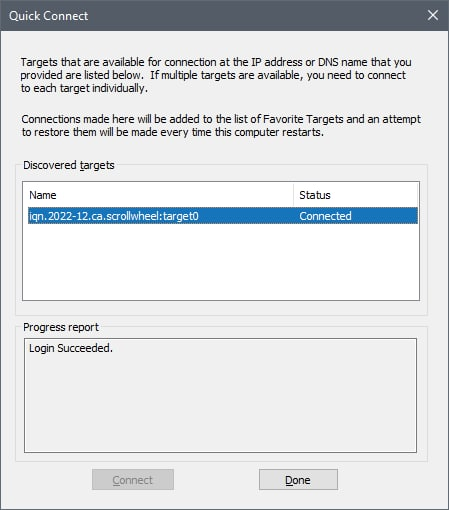
And it connects just fine. Note it’ll also automatically reconnect on startup too, so you don’t have to do this again.
Disconnecting can be done from the main window for the iSCSI initiator.
Expanding our volume
Note I made a 4 GB volume. That’s fine for a test, but it’s probably limiting for anything useful. Luckily, expanding a volume in ZFS is basically free. I would really recommend disconnecting the initiators from the target. It might work, but they could be confused by having the disk properties change out from under them. Play it safe.
It’s pretty simple to do – the size is a property on the volume, so just set the volsize property. (Note that this can also be used to truncate a volume – this can cause data loss, so do it with caution.)
# zfs list srv/target
NAME         USED  AVAIL     REFER  MOUNTPOINT
srv/target  4.13G  5.29T     1.05G  -
# zfs set volsize=200GB srv/target
# zfs list srv/target
NAME         USED  AVAIL     REFER  MOUNTPOINT
srv/target   206G  5.29T     1.05G  -
Note I also had to reload (but not necessarily restart) ctld for it to notice the new size of the volume. That’s just a light tap with service ctld reload.
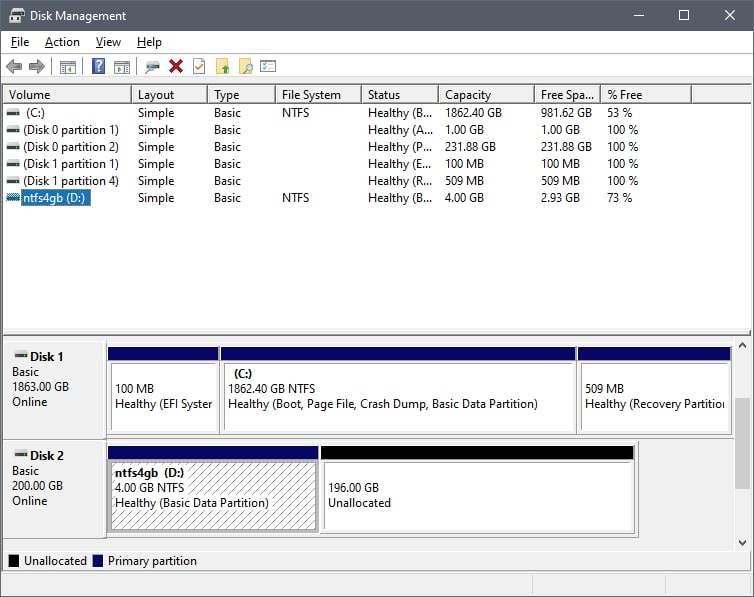
Once it’s expanded, the partition table of the volume you have won’t change. You’ll need to use whatever partitioning software you prefer to expand those. For example, here’s Disk Management showing the new size, with the old partition:
That’s it for this article. Let me know if you found it useful.